Most Python web scraping tutorials follow the same old script: fetch a webpage's HTML with requests, then pick it apart with BeautifulSoup. And sure, that works just fine if you're pulling data from a simple, static website from 2010. But that approach shatters the moment you point it at a modern site with any real anti-bot defenses.
This guide is going to show you a more resilient way to build scrapers that can handle the complexities you’ll actually run into. We'll start by exploring the common problems that break DIY scrapers, compare different approaches, and then walk through a step-by-step solution for building a robust scraper that actually works in the real world.
The Problem: Why Your Web Scrapers Keep Failing
Let's be honest—most web scraping guides walk you through scraping a perfect, static webpage. You build your script, feel great about it, and then aim it at a real e-commerce site. It breaks instantly. We're skipping the "hello world" examples to get straight to the real challenges you've probably already faced.
These roadblocks are becoming the norm. The global web scraping market is valued at around $1.03 billion as of 2025 and is on track to double by 2030. Python is the go-to language for this, but developers are hitting a major wall: nearly 43% of enterprise websites now deploy anti-bot protections. If you're curious about the numbers, you can dive into more web crawling industry benchmarks to see what you're up against.
If you’ve tried building a scraper before, this list of headaches probably looks painfully familiar:
- Dynamic JavaScript Content: The data you need isn't even in the initial HTML. It's loaded by JavaScript after your script has already moved on.
- CAPTCHAs: The classic "I'm not a robot" tests that stop your automated scripts cold.
- IP Blocks & Rate Limiting: Your scraper sends a few too many requests, and suddenly, the server slams the door with a
403 Forbiddenor429 Too Many Requestserror. Your IP is toast. - Frequent HTML Changes: The target website gets a facelift, and every single one of your carefully crafted CSS selectors breaks.
The real problem with a DIY approach is that you're stuck in a constant cat-and-mouse game. Every time a site updates its security, your scraper breaks, and you're right back to square one, debugging your code.
This tutorial maps out a more reliable path forward. We’ll compare the standard DIY method using Requests and BeautifulSoup with a much more robust solution: a dedicated scraping API like Olostep. An API handles all of that messy complexity for you, so you can build scrapers that actually work on the modern web, not just on simple test sites.
Preparing Your Python Scraping Environment
Before we dive into the code, let's get our workshop set up. A little prep work now saves a ton of headaches later, especially when dealing with different Python packages and versions. We're going to build a clean, professional Python environment from the ground up.
The first, and most crucial, step is creating an isolated workspace using a virtual environment. Think of it as a fresh, self-contained sandbox just for this project. Honestly, this is a non-negotiable habit for any serious developer. It keeps the libraries for this project from clashing with anything else you have installed on your machine.
Step 1: Create a Clean Workspace
Fire up your terminal or command prompt and head over to your project directory. We’ll use Python's built-in venv module, which makes this super easy.
On macOS or Linux, run this:
python3 -m venv venv
source venv/bin/activate
And for Windows users:
python -m venv venv
.\venv\Scripts\activate
You'll know it worked when your terminal prompt changes to show the (venv) prefix. That little change means you’re now operating inside your brand-new, isolated environment. Perfect.
Now, let's install our first tool: the requests library. This is the gold standard for making HTTP requests in Python, turning the often-complex task of talking to a web server into a few simple lines of code.
pip install requestsMy Advice: As soon as you install your first package, get in the habit of creating a
requirements.txtfile. It's a lifesaver for you (and anyone else who works on your code) to perfectly recreate the environment. Just runpip freeze > requirements.txt.
Step 2: Grab Your Olostep API Key
The last piece of the puzzle is your API key for Olostep. This is the tool we'll use to sidestep a lot of the common scraping frustrations, like getting stuck on CAPTCHAs or having our IP address blocked.
It’s a quick process:
- Head over to the Olostep website.
- Sign up for a free account.
- Once you're in, find the API key on your dashboard.
Copy that key and keep it somewhere safe. We’re going to need it in the next section to authorize our requests and run our first real-world scraper.
Alright, our environment is prepped and ready to go. Now for the fun part: writing the code.
Executing Your First Real-World Scrape with Python
With the setup out of the way, it's time for the fun part. We're going to build our first scraper and pull down the full HTML from a real e-commerce product page.
Instead of hitting the site directly—a surefire way to get our IP address flagged—we'll use the Olostep API. Think of it as a smart middleman. We send a POST request to its endpoint, and the API handles all the messy anti-bot stuff like CAPTCHAs and proxy rotation, returning the clean HTML we need.
We’ll be using Python’s requests library to communicate with the Olostep API. The process involves sending a simple JSON payload containing the target URL.
Building the API Request in Python
Let's jump into the code. The script below is a complete, runnable example designed for clarity. It demonstrates how to authenticate, send a request, and handle potential responses.
Don't forget to replace 'YOUR_API_KEY' with the actual key from your Olostep dashboard.
import requests
import json
import os
import time

# --- Configuration ---
# It's best practice to load your API key from an environment variable.
API_KEY = os.getenv('OLOSTEP_API_KEY', 'YOUR_API_KEY')
# The target URL we're scraping. Let's use a popular book on Amazon.
TARGET_URL = 'https://www.amazon.com/dp/B0756CYWWD'
# The Olostep API endpoint for scrapes.
API_ENDPOINT = 'https://api.olostep.com/v1/scrapes'

# --- Main Scraping Logic with Retries ---
def scrape_with_olostep(url, retries=3, backoff_factor=2):
    """
    Sends a request to the Olostep API to scrape a given URL,
    with exponential backoff for retries.
    """
    if API_KEY == 'YOUR_API_KEY':
        print("Error: Please replace 'YOUR_API_KEY' with your actual Olostep API key.")
        return None

    # Define the request headers, including authentication.
    # A custom User-Agent is good practice for ethical scraping.
    headers = {
        'Content-Type': 'application/json',
        'Authorization': f'Bearer {API_KEY}',
        'User-Agent': 'MyScrapingBot/1.0 (contact@example.com)'
    }

    # This is the simple JSON payload our API needs.
    payload = {
        'url': url
    }

    print(f"--- Full Request ---")
    print(f"Endpoint: POST {API_ENDPOINT}")
    print(f"Headers: {json.dumps(headers, indent=2)}")
    print(f"Payload: {json.dumps(payload, indent=2)}")
    print("-" * 20)

    for attempt in range(retries):
        try:
            # Execute the POST request with a generous timeout.
            response = requests.post(API_ENDPOINT, headers=headers, json=payload, timeout=60)

            # Check for successful response (HTTP 200-299)
            if response.ok:
                print("Successfully received response from Olostep!")
                return response.json()
            # Handle specific client/server errors that might be retriable
            elif response.status_code in [429, 500, 502, 503, 504]:
                print(f"Attempt {attempt + 1} failed: Received status code {response.status_code}. Retrying...")
            # For other errors (e.g., 400, 401, 403), retrying won't help.
            else:
                print(f"Error: Received non-retriable status code {response.status_code}")
                print(f"Response Body: {response.text}")
                return None

        except requests.exceptions.Timeout:
            print(f"Attempt {attempt + 1} failed: Request timed out. Retrying...")
        except requests.exceptions.RequestException as e:
            print(f"Attempt {attempt + 1} failed with an unexpected error: {e}")

        # If this isn't the last attempt, wait before retrying
        if attempt < retries - 1:
            wait_time = backoff_factor ** attempt
            print(f"Waiting for {wait_time} seconds before next attempt...")
            time.sleep(wait_time)

    print("All retries failed. Could not fetch the URL.")
    return None

if __name__ == "__main__":
    scraped_data = scrape_with_olostep(TARGET_URL)

    if scraped_data:
        # Let's pretty-print the JSON response to see what we got.
        print("\n--- Full API Response ---")
        print(json.dumps(scraped_data, indent=2))

        # Accessing the HTML content is straightforward.
        html_content = scraped_data.get('data', {}).get('content')
        if html_content:
            print(f"\nSuccessfully extracted {len(html_content)} characters of HTML.")
        else:
            print("\nCould not find HTML content in the response.")
Deconstructing the API Response
When you run that script, the Olostep API doesn't just send back a messy wall of HTML. It returns a clean, structured JSON object that gives you helpful context about the scrape.
This image from the Olostep homepage gives you an idea of the structured data you get back.
The JSON response includes useful metadata, like the final URL the scraper landed on (in case of redirects). But the gold is inside the data.content key—that's where our fully rendered HTML lives.
Here’s a simplified look at the response structure:
{
  "status": "success",
  "data": {
    "url": "https://www.amazon.com/dp/B0756CYWWD",
    "content": "<!DOCTYPE html><html><head>...</head><body>...</body></html>",
    "statusCode": 200
  },
  "requestId": "req_abc123"
}
Key Takeaway: Your prize is
data.content. This field contains the complete, JavaScript-rendered HTML of the product page. This raw material is exactly what we need for the next step: parsing out specific details like the product's title and price.
Checking for a successful response and implementing a retry strategy with response.ok is crucial. This basic error handling ensures we only try to parse data when we've actually received it successfully and can recover from temporary network issues.
If you're tackling a particularly tough target like Amazon, you might want to check out our deep-dive guide on how to scrape Amazon for more advanced strategies. For now, though, we have our HTML, and we’re ready to start parsing.
Turning Raw HTML Into Structured Data
Getting the raw HTML is a huge step, but it’s really just the beginning. The good stuff—the actual data you're after—is buried inside that massive wall of text. Our next job is to pull it out, and that's where parsing comes in. Think of it as turning a messy, unreadable document into clean, organized information.
For this, we'll lean on BeautifulSoup, which is pretty much the gold standard in the Python world for navigating and searching through HTML.
Before you even write a line of parsing code, you need to know what you're looking for. The best way to do this is with your browser's built-in "Inspect" tool. This is a fundamental skill, often covered in guides about things like how to save Instagram photos on PC, because it lets you pinpoint the exact CSS selectors—like id="productTitle" or class="a-price-whole"—that act as road signs to your target data.
Parsing HTML with BeautifulSoup
First things first, let's get BeautifulSoup installed along with its best friend, lxml. We use lxml because it's incredibly fast and reliable. With your virtual environment still active, pop open your terminal and run this:
pip install beautifulsoup4 lxmlOnce that’s done, we can take the HTML content we got from the Olostep API and feed it directly to BeautifulSoup. The library works its magic, creating what’s called a "parse tree." It’s basically a neat, navigable map of the webpage that our Python script can easily read and understand.
The whole process of getting the data ready for parsing looks something like this:
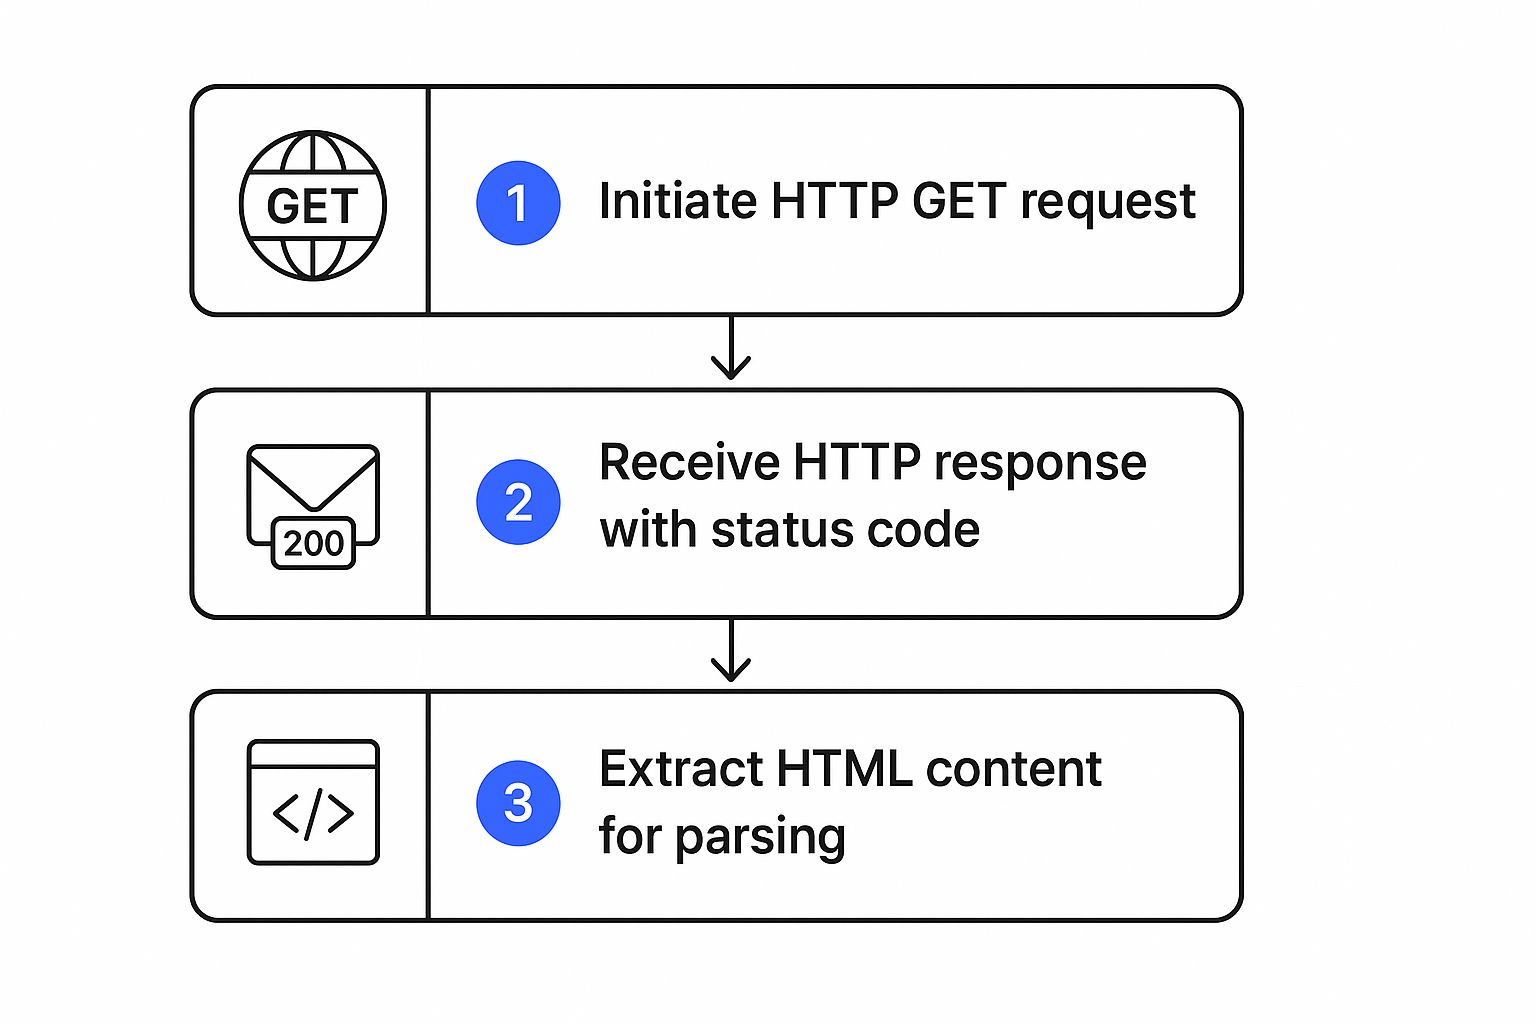
This workflow shows how we get our hands on the raw material—the HTML—that we're about to turn into something useful.
From Tags to Dictionaries
Alright, time to grab the data. Using the CSS selectors we found earlier, we can tell BeautifulSoup exactly what to pull.
A couple of handy methods here:
.select_one()is perfect for finding the first element that matches a selector..get_text(strip=True)is great for grabbing the text from an element and automatically cleaning up any annoying extra whitespace around it.
Here’s how you’d actually do it in code. This snippet extracts a product's title and price, then neatly organizes it into a Python dictionary.
from bs4 import BeautifulSoup

# --- Parsing Function ---
def parse_product_data(html_content):
    """Parses the HTML to extract product title and price."""
    if not html_content:
        print("HTML content is empty. Cannot parse.")
        return None

    soup = BeautifulSoup(html_content, 'lxml')

    # Extract data using specific CSS selectors with robust checks.
    # The 'try-except' block adds another layer of safety against parsing errors.
    try:
        title_element = soup.select_one('#productTitle')
        price_element = soup.select_one('span.a-price-whole')

        product_data = {
            'title': title_element.get_text(strip=True) if title_element else 'N/A',
            'price': price_element.get_text(strip=True).replace('.', '') if price_element else 'N/A'
        }
        return product_data
    except Exception as e:
        print(f"An error occurred during parsing: {e}")
        return None

# --- Main execution flow continued ---
if __name__ == "__main__":
    # Assuming 'scraped_data' is from the previous step
    if scraped_data:
        html_content = scraped_data.get('data', {}).get('content')
        parsed_product = parse_product_data(html_content)

        if parsed_product:
            print("\n--- Parsed Data ---")
            print(json.dumps(parsed_product, indent=2))
        else:
            print("Failed to parse product data.")
Pro Tip: See that
if title_element else 'N/A'check? Get in the habit of always doing that. Websites change their layouts all the time, and a selector that works today might disappear tomorrow. This simple check prevents your script from crashing with aNoneTypeerror and makes it much more robust. It's a crucial practice if you want to turn websites into LLM-ready data because it keeps your dataset clean.
Saving Your Data to a CSV File
Now that we have our data structured in a dictionary, the last piece of the puzzle is saving it somewhere useful. A CSV (Comma-Separated Values) file is a great choice because it’s a universal format that can be opened by pretty much any spreadsheet program, like Excel or Google Sheets.
Python’s built-in csv module makes this super simple.
The code below will append our dictionary as a new row in a file called products.csv.
import csv

def save_to_csv(data, filename='products.csv'):
    """Appends a dictionary of data to a CSV file."""
    if not data:
        print("No data to save.")
        return

    # Define the file name and what the columns should be called
    csv_headers = list(data.keys())

    # Check if file exists to decide whether to write headers
    file_exists = os.path.isfile(filename)

    # Use 'a' for append mode so we don't overwrite the file each time
    with open(filename, mode='a', newline='', encoding='utf-8') as file:
        writer = csv.DictWriter(file, fieldnames=csv_headers)

        if not file_exists:
            writer.writeheader()  # Write header only if file is new

        writer.writerow(data)

    print(f"Data successfully saved to {filename}")

# --- Main execution flow continued ---
if __name__ == "__main__":
    # ... (previous scraping and parsing code) ...
    if parsed_product:
        save_to_csv(parsed_product)
And there you have it! You've gone through the entire scraping workflow: making a request, parsing the response, and storing the clean data for later use.
Building a Resilient Scraper: Anti-Bot, Ethics, and Troubleshooting
Alright, you’ve built a scraper that works once. That’s a great first step. But the real challenge is building a scraper that can run reliably for days or weeks without falling over. This requires anticipating what can and will go wrong.

A truly resilient scraper doesn't just give up. Network glitches, server timeouts, and temporary IP blocks happen. A robust scraper takes these in stride, handles them gracefully, and keeps running.
Advanced Anti-Bot Guidance
Beyond basic retries, defeating modern anti-bot systems requires a multi-faceted approach:
- Rate Limits and Delays: Never slam a server with requests. Introduce random delays (
time.sleep(random.uniform(1, 4))) between requests to mimic human browsing behavior and respect the target's infrastructure. - Realistic HTTP Headers: The
User-Agentis just the start. Sophisticated systems check for other headers likeAccept-Language,Accept-Encoding, andReferer. Using a library to cycle through realistic browser headers can significantly reduce detection rates. - Proxy Management: A single IP address is a dead giveaway. Rotating through a pool of high-quality residential or datacenter proxies is essential for any serious scraping project. This is a primary feature of scraping APIs.
Troubleshooting Common Failures
- CAPTCHAs: If you encounter a CAPTCHA, your scraper has been detected. A DIY solution involves integrating third-party CAPTCHA-solving services, which adds complexity and cost. A scraping API handles this automatically.
- 403/429/5xx Errors:
403 Forbidden: Your IP or user-agent is likely blocked. Rotate both.429 Too Many Requests: You're hitting rate limits. Slow down your requests significantly.5xx Server Error: The server is having issues. This is where exponential backoff is most effective. Wait and retry.
- Timeouts: Increase the
timeoutparameter in yourrequestscall, but also investigate if the target site is deliberately slowing down your connection.
Ethical and Legal Considerations
The web is a shared resource, and being a good digital citizen is part of the job. Ethical scraping isn't just about covering your legal bases; it's about not crippling the very websites you need data from. When you understand the strategic value of social media monitoring for business intelligence, you also understand the importance of keeping that data source healthy and accessible.
Here are the ground rules I always follow:
- Respect
robots.txt: Think of this file (e.g.,example.com/robots.txt) as the website's house rules for bots. While not legally enforceable, ignoring it is bad practice and can get you blocked. - Identify Yourself: Don't be anonymous. Set a descriptive User-Agent in your request headers that identifies your bot and maybe includes a URL or email for contact.
- Scrape Responsibly: Never fetch data faster than a human would. Cache data when possible to avoid re-requesting the same page.
- Avoid Personal Data: Be extremely careful with personally identifiable information (PII). Unless you have a crystal-clear legal reason and explicit consent, just don't scrape it. Fines from regulations like GDPR and CCPA are severe.
Comparing Web Scraping API Alternatives
While you can manage headers and proxies yourself, the complexity grows exponentially when facing advanced anti-bot systems. This is where using a managed API starts to make a lot of sense. Instead of wrestling with infrastructure, you can offload that entire headache.
Here's a fair comparison of how some of the top web scraping APIs stack up. This isn't an exhaustive list, but it highlights key features that save development time and improve reliability.
| Feature | Olostep | ScrapingBee | Bright Data | ScraperAPI | Scrapfly |
|---|---|---|---|---|---|
| Proxy Rotation | Automatic | Automatic (Residential & Datacenter) | Extensive (Residential, Datacenter, Mobile) | Automatic (Residential & Datacenter) | Automatic |
| CAPTCHA Solving | Included | Included on higher plans | Add-on service | Included | Included |
| JavaScript Rendering | Yes | Yes (Headless browser) | Yes (Browser-based) | Yes (Headless browser) | Yes |
| Geotargeting | 50+ countries | Supported | 195+ countries | Supported | Supported |
| Concurrent Requests | High | Plan-dependent | High | Plan-dependent | Plan-dependent |
| Ease of Use | Very High | High | Moderate (More complex setup) | Very High | High |
As you can see, while many services offer similar core functionalities, the implementation and accessibility can differ. Services like Olostep and ScraperAPI focus on abstracting away complexity into a simple endpoint. Others, like Bright Data, offer immense control and a massive proxy network but with a steeper learning curve. Your choice ultimately depends on your project's scale and how much of the underlying infrastructure you want to manage yourself.
Conclusion: Checklist, Next Steps, and CTA
We've covered a lot of ground, from setting up your environment to building a robust, ethical, and resilient scraper. Let's recap with a concise checklist and outline your next steps.

Final Project Checklist
- Setup: Is your project in a Python virtual environment (
venv)? - API Request: Are you using an API like Olostep to handle anti-bot measures?
- Error Handling: Does your code include
try-exceptblocks for network errors? - Retries: Have you implemented a retry mechanism with exponential backoff?
- Parsing: Is your parsing logic robust, checking for
Nonebefore accessing element methods? - Ethics: Are you respecting
robots.txt, setting aUser-Agent, and rate-limiting your requests? - Storage: Are you saving your structured data cleanly to a format like CSV or JSON?
Next Steps
- Scale Up: Adapt the script to scrape a list of URLs instead of just one. Loop through a list of product links and save each one to your CSV.
- Explore More Data Points: Go back to the target page with the "Inspect" tool and find selectors for other data like customer reviews, product descriptions, or image URLs.
- Schedule Your Scraper: Use a tool like Cron (on Linux/macOS) or Task Scheduler (on Windows) to run your Python script automatically at set intervals.
This shift towards managed scraping solutions isn't just a hunch; the numbers back it up. The AI-driven web scraping market was valued at around $6.23 billion in 2024 and is on track to explode to $46.1 billion by 2035. This growth is almost entirely fueled by the raw efficiency of these managed services. You can get a better sense of this trend by reading up on the growth of the AI-driven web scraping market.
If you want a more detailed breakdown, we’ve put together a guide on the top scraping tools available today that's worth a read.
Ready to build scrapers that actually work without getting blocked? Olostep provides a powerful, reliable API that handles all the anti-bot complexity for you. Get your free API key and start scraping in minutes. Get Started with Olostep for Free
Common Python Web Scraping Questions
As you get your hands dirty with web scraping, you'll inevitably run into the same questions that trip up everyone starting out. Let's walk through some of the most common ones I hear, so you can build a solid foundation for your projects.
Web Scraping vs. Web Crawling: What Is the Difference?
It’s incredibly common to hear these terms used interchangeably, but they are fundamentally different beasts. Understanding the distinction is key.
Web scraping is all about targeted data extraction. Imagine you need the price, name, and stock status for a specific product on an e-commerce page. You write a script to go to that one URL, grab those specific pieces of information, and you're done. It's precise, like a surgical strike for data.
Web crawling, on the other hand, is about exploration and discovery. A crawler starts on one page and follows every link it can find to discover other pages on the same site or even across the internet. The main goal isn't to pull specific data points but to map out the website's structure. Think of how Google's bots work—they crawl the web to index everything.
Can You Scrape a Website That Requires a Login?
Absolutely, but this is where things get a bit more advanced. Scraping a site that's locked behind a login page means your script has to act like a real user and authenticate itself first.
This usually means you need to manage sessions and cookies. When you log in through a browser, it saves a cookie to remember you're logged in. Your script needs to do the same thing.
A great tool for this in Python is the requests.Session() object from the Requests library. It automatically handles cookies for you, so after you programmatically log in, every subsequent request you make with that session object will be authenticated. For really complex login flows, you might even turn to browser automation tools that can fill out forms and click buttons just like a person would.